Using Custom Fields in your projects

When managing and tracking your issues and tasks, it’s important that you get the information you need from those reporting or updating your issues.

MantisHub has native fields that exist ‘out-of-the-box’ that will capture generic information relevant to any issue, no matter your business. These are things like the reporter of the issue, the time of reporting, priority, status, last update and more.

We also have common project management and software development fields that you can tap into, with our support for due date, time tracking, and versions.

However, there will always be specific information needed that might only be relevant to your industry or business. You might even have data specific to certain projects that you are running. If that’s the case, you should take a look at MantisHub Custom Fields. It allows you to create a new field with a specific data type and settings, and link it to the projects where you want to gather the data.

Configuring Custom fields

This functionality is on by default and is configurable via your Manage page. Head to the Custom Fields tab, enter in the name of your new field, click the “New Custom Field” button and you’re on your way.
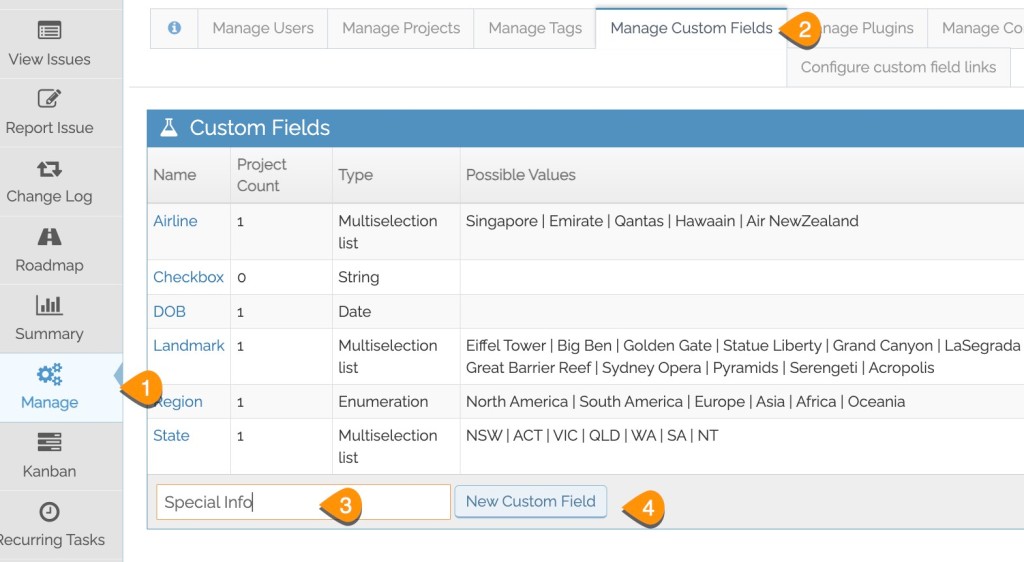
There are a number of aspects of the custom field you need to define including, type, default value, possible values, access to read or edit this field and the length of the field.

Custom field types
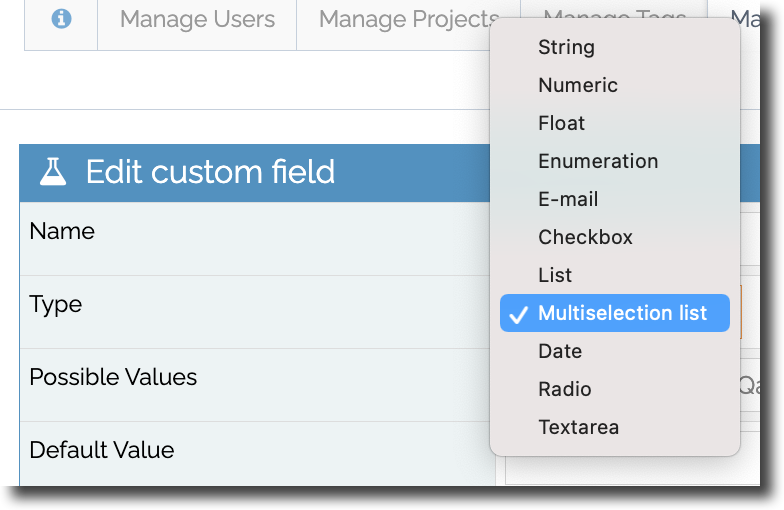
Most of the ‘Type’ options for custom fields are self-explanatory (string, numeric, text area etc). However, we’ve had some common questions from our customers which we’ve turned into these tips below:

  1. Float is essentially a decimal number.
  2. Enumeration is a list of values and is displayed as a dropdown list. You can only select one option and a check mark is displayed next to the selection.
  3. List shows you all the value options in one box.
  4. Multiselect is a list that allows selection of more than one option by holding the Shift/Cmd/Ctrl key.
  5. Checkbox and Radio both display all options with a box or circle to denote the selection. Checkbox will allow more than one value to be checked whereas Radio only allows one value.

Other custom field settings

You also have a number of settings in the custom field configuration where you can nominate if this field should be:

  • displayed when reporting, editing, resolving or closing an issue
    • mandatory when reporting, editing, resolving or closing an issue
      • available as a filter option on the View Issues page.

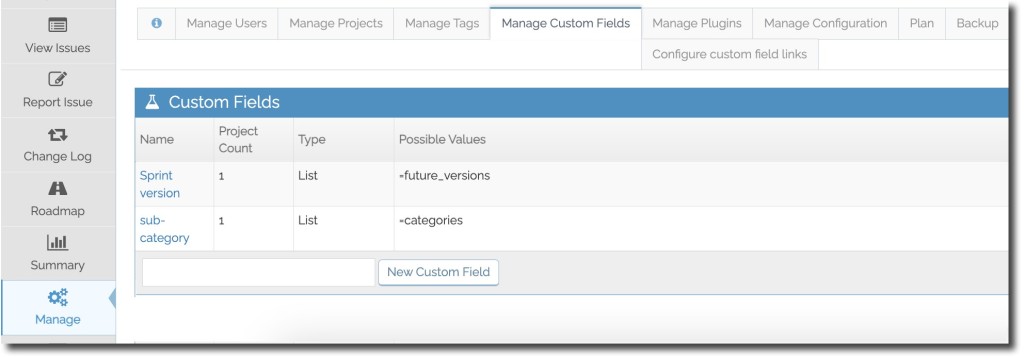
Cool Feature: You can reference your versions and categories fields as possible values of a custom field! When defining your custom field, set the type to be ‘List’ and within the ‘Possible Values’ setting you can define the following options:

  • ‘=users’ will list users with access to the project + empty/none option
  • ‘=handlers’ will list users with access to be assigned issues in the project + empty/none option
  • =versions‘ will lists all non-obsolete versions
  • =released_versions‘ will list all released versions
  • =future_versions‘ will list all non-released, non-obsolete versions
  • =categories‘ will use your list of categories
But keep an eye on this space… cause we hope to release more options for referencing other fields as possible values in the future! Check out our support article for help on creating custom fields.

Linking the field to the project

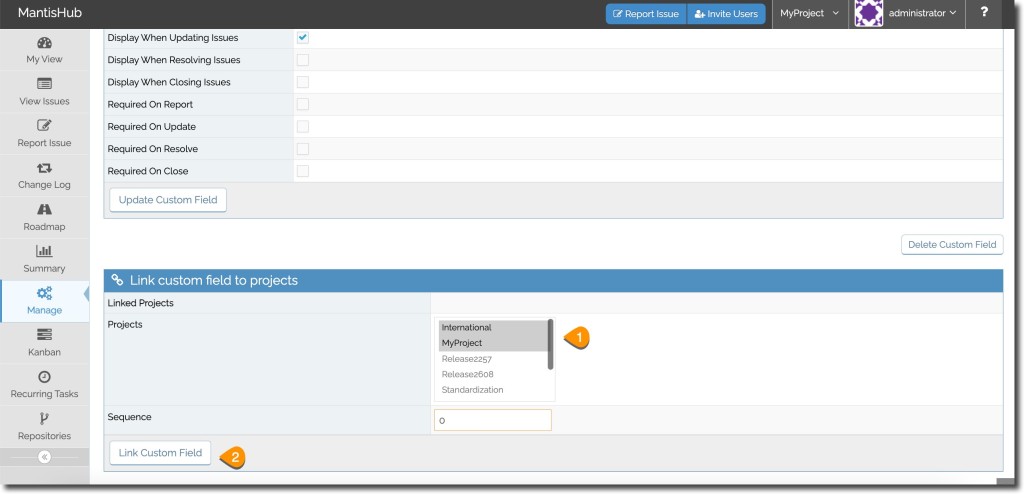
Once the custom field is created, you need to link it to the projects in which you wish to use it. Go into your newly created custom field and scroll to the bottom where you will see the “Link custom field to projects” section. Select the project (or multiple projects by holding down the shift + ctrl/cmd key). Optionally you can specify a Sequence which determines the order in which it appears in the issue details. Then Click “Link Custom Field”.
Happy data gathering! As always you can reach out to the MantisHub experts on the support team if you need help with any aspect of setting up or linking custom fields.

Tracking Time in MantisHub

Whatever your business may be, keeping a record of the time that members of your team spend on your project tasks or issues can help in many areas, providing data to help with developing efficient, cohesive workflows for your business tasks. It’s also necessary where businesses have specific business needs to track time spent against tasks within your organization. There can be several reasons you need your team to record any time spent on their tasks.

  • Where clients are charged based on tracked hours spent on client services.
  • Managers and supervisors are required to regularly report on the efficiency of teams and measure performance.
  • Planners need to predict resource needs for future projects by identifying bottlenecks or high demand areas.

So among our many handy features and integrations, MantisHub have a few options to address your task time-tracking needs.

In-built MantisHub time tracker

Setup is easy: The easiest way to start tracking time is to turn on the in-built time tracking feature within MantisHub. Turning it on just requires a simple line of configuration and straight away you’ll be able to enter time details in your issues and run reports on time spent on issues. Full setup instructions can be found in our Setting up Time Tracking support article.

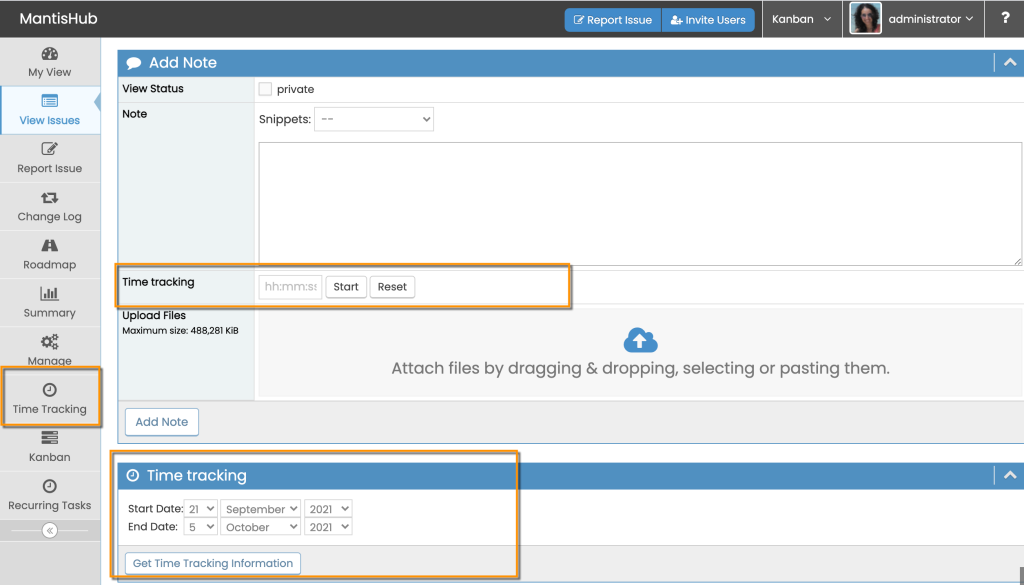
Enter time manually or automatically: Once enabled, your team can record time spent on the issue as part of issue updates. You can either enter these details manually, or enable the stop watch feature. With the stop watch feature you can just click the start button when you begin working on a task and stop when you’re done, to record time spent automatically.

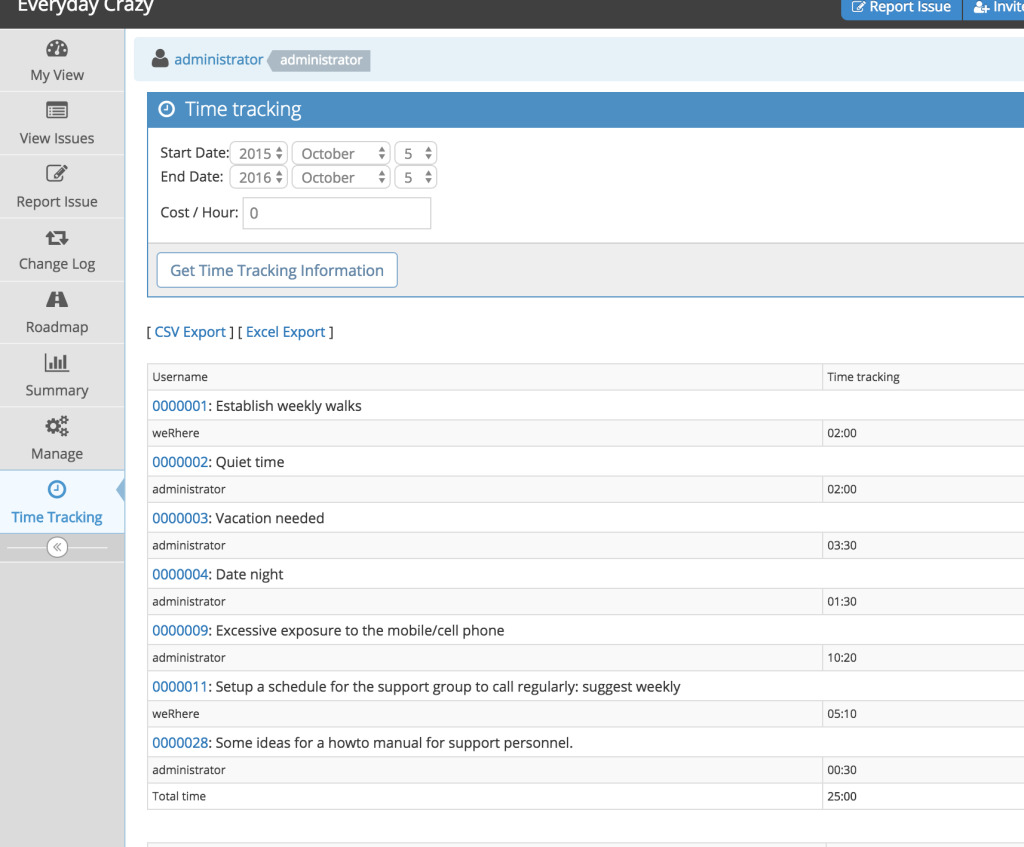
Report on time spent: When you turn on time tracking, you’ll notice a new menu item on the left hand main menu where managers can run reports on tracked time within a project for any specified period. Project management and resource planning is easier with the ability to view just how much time your team is spending within each area. It’s also great for client chargeback as you also have the option to turn on time tracking billing. This feature allows you to specify a hourly cost for time spent and total cost per task will be calculated and displayed in your report!

For more information on using MantisHub’s in-built time tracking feature, check out this article or sign up for a free MantisHub trial to test it out.

Time Tracking Integrations

If you already use a dedicated time tracking service in your organization and want to tap into existing functionality, MantisHub offers integrations with several third-party time tracking services. Using browser (e.g. Google Chrome or Microsoft Edge) extensions, you can connect MantisHub to:

Toggl – Install the Toggl extension here.

Clockify – Install the Clockify extension here.

TimeCamp – Install the TimeCamp extension here.

Once installed, you’ll see a timer button when you head into your MantisHub issues. Just click, and time starts recording in your third party application. These integrations also import MantisHub project and issue information. So you can automatically populate fields such as task name, description and project!

So there are a few options for you to go ahead and try out! If you do have any other application that you prefer to use for time tracking, you can always reach out to your provider to request an integration with MantisHub or reach out to our team. We’re happy to work with them to provide a solution for you.

Growing with you – MantisHub plans for all teams great and small.

With plans to fit all shapes and sizes, MantisHub can cater for your small, growing or large teams. Our fully hosted issue and bug tracking solution can meet your needs, whether you are just starting out or you need a large corporate-wide solution to support 1000 or more users. We can also offer enterprise-level on-premise solutions if you have policies requiring you to maintain an in-house MantisBT setup.

MantisHub hosted plans

MantisHub is primarily a hosted cloud-based solution provider based on open-source MantisBT with the added value of:

  • Access from anywhere: built on AWS infrastructure, you can be sure of speedy, reliable service wherever you are in the world and the security of your data.
  • No maintenance overhead: all server, software and feature updates are performed by our team as soon as they become available. And we do daily backups of your data.
  • Expert email support: our team of MantisBT experts are on hand to help with any issues or offer advice on best practises in setting up your system.
  • Customizations: are available to tailor your workflows to suit your specific processes.
  • MantisHub exclusive features and plugins: such as Helpdesk for integrated customer support ticketing, chat integrations, SSO with ID providers such as Google & Microsoft and much more!

With a lower overall cost of ownership, this is where you’ll get the biggest bang for your buck with less work for you. Check out our pricing page to see which plan suits you in terms of user numbers and desired features. We suggest you start with the Platinum plan which includes 30 users accounts, 10GB of data storage and includes most MantisHub features.

Platinum Plus – Volume discounted plans

Once you have exceeded 100 users in your MantisHub, it’s worth checking out our Volume discounted plans. Here we drop the price per user significantly with added discounts for annual plans plus larger storage allocations. If you head to our pricing page calculator, just plug-in your user numbers and we’ll suggest the best value plan for you. Or see the table below for full Platinum Plus options:

PlanUsersStorageMonthly PriceAnnual Price
Platinum 200up to 20020GB$275*$2,750*
Platinum 300up to 30030GB$300*$3,300*
Platinum 500up to 500250GB$350*$3,850*
Platinum 1000up to 1000100GB$500*$5,500*
pricing current Jul 2020. Subject to change.

Migrating your in-house MantisBT

MantisBT is free open source software that you would have installed, set up and maintained on your own servers and infrastructure. You will have had to rely on internal expertise or MantisBT online forums for any help or support.

If you currently run MantisBT in-house you can alleviate your maintenance load, tap into expert support, widen service availability and keep all your existing data and users. Purchase our migration program for quick, seamless relocation of your database to MantisHub to enjoy all the benefits listed above straight away. We highly recommend this path and our migrated customers, without exception, love the result! We also now offer hosting within the EU for those who need to retain their data within Europe to satisfy GDPR policies.

On-premise Enterprise plan

Some of our customers are required to keep data out of the cloud and maintain an in-house database due to corporate or industry policies. We now include in our offering, remote support services for these customers. Some items that can be included in your custom enterprise-level support solution are:

  • Software updates to bring your MantisBT to the latest release.
  • Migration of your MantisBT database to a new server.
  • Supported workflow customizations.
  • MantisHub hosted service for staging and testing.
  • Email support with access to our experienced team and to all our support documentation and video tutorials.
  • Setup of regular backups.

Drop an email to our team or book a consult to chat about your requirements.

Getting on the right plan

If you are new to MantisHub, you have plenty of time to test out all the functionality and features of MantisHub bug and issue tracking with our 14-day trial. Your setup in a minute or two with no obligations and no credit card needed. And when you’re ready, just add payment details and select the plan that fits your team size and feature needs.

Need a migration? It is so easy to move your legacy, in-house MantisBT across to MantisHub. Sign up for a trial and then email support to schedule a suitable weekend for your migration. Deliver your data on Friday afternoon and we get you up and running smoothly by Monday morning!

If you already have a MantisHub subscription, you can change your plan at any time via your billing portal. If you are near passing the 100 user mark, make sure to check out our Platinum Plus bulk user plans to take advantage of discounted user pricing for as little as 45c per user per month. If you have any issues at all, you can just reach out to our support team and they can help advise you on the right plan for you or help move you across.

Looking forward to having you onboard with us!

Scheduled issue creation with Recurring Tasks

Recurring tasks

MantisHub has just launched a super useful plugin exclusive for MantisHub customers to help you handle those regular ongoing tasks that every team has on their plate.

There is only so much information you can fit into a calendar reminder so having the added functionality of automatic creation of an issue that you can track through to completion, which includes any repetitive data and details, inherits default field values (e.g. priority or due dates), automatically assigned to the right person as well as triggering email notifications (or integrated with your chat application) to keep everyone in the loop is a huge bonus!

Available for Platinum and above plans, our Recurring tasks plugin allows you to set a schedule for automatic creation of issues with your desired settings.

Tasks can be set daily, weekly, monthly or annually and you can set a default description and assignment as well as restrict the number of times the task is created.

The use cases are endless. You can use it to automatically create issues and track tasks. such as:

  • annual service subscription renewals or performance appraisals
  • monthly reporting, invoicing, or payroll
  • weekly check on cloud consumption costs to avoid surprises.
  • daily dashboard and log checks

You know your system best and how recurring tasks can help in your workflow and business processes to improve efficiency. And to make sure those repetitive tasks (not always particularly popular) don’t get swept under the carpet.

Super flexible too. Once created, you can amend, re-assign, limit, disable or re-enable tasks as needed. Check out our support article for more details on how to turn it on and how it all works. 

Hope we’ve helped solve some of your work problems with the Recurring tasks plugin! If so, we’d love to hear from you! Tweet @mantishub and let us know what kind of automation you’ve set up with Recurring tasks. Or reach out to us at any time with your feedback.


Single Sign-on via Open ID Connect for Office 365, Google, Github and Bitbucket

SSO-2

MantisHub team is excited to announce the release of Open ID federation support for single sign-on! With our AuthHub plugin, we provide open ID connect with multiple identity providers. Continue reading “Single Sign-on via Open ID Connect for Office 365, Google, Github and Bitbucket”

Exporting User Information and Access

blogexport

If you’re already a MantisHub customer you know that having Mantis hosted rather than running it all yourself is a huge plus. Instant setup, no upgrade, maintenance or backups overhead and access from anywhere! You also get access to their excellent support team who can help out and listen to all your feedback. Continue reading “Exporting User Information and Access”

Your MantisHub Data at your fingertips

exportdata

The beauty of hosting with MantisHub is that you will never need to worry about the retention, accessibility or integrity of the data stored in your MantisHub issue tracking system.

All the advantages of cloud hosting are at your fingertips. Like logging into your system from any place or any machine securely.  No need to worry about the security of your servers or disaster recovery. MantisHub hosting is robust, reliable, and secure, with daily backups of your data. Continue reading “Your MantisHub Data at your fingertips”

User Access and Team Collaboration in MantisHub

istock-business-users-chatting-animate

You will rarely be using MantisHub issue tracker in isolation. As long as you have an internet connection you can be on a remote island connected to MantisHub but I bet you won’t be the only one on. Hopefully you have a whole team of users, reporters, managers, stakeholders, collaborators that you can bring together to make your visions a reality. That’s the goal right? Continue reading “User Access and Team Collaboration in MantisHub”

December ’15 updates

In December we rolled out a bunch of new updates including:

  • Using API Tokens to access MantisHub for enabling generation of tokens to be used by services and apps to connect to MantisHub without sharing user’s passwords.
  • Understanding Email Notifications via EventLog Plugin – often actual email notifications are different from administrators expectations due to MantisHub config or user preferences.  Installing this plugin helps administrators figure out the reason why users get or don’t get notified about a change.
  • Support for issue notes as a column that can be selected via Manage Columns.  The typical usage would be to export issue notes to CSV or Excel.
  • Support for exporting billing information to CSV or Excel, providing users with the ability to edit the information in Excel before sending to clients.
  • Custom field “required on resolve” wasn’t being enforced.
  • Disallow deletion / disabling of last administrator to make sure administrators can’t lock themselves out.
  • Fix for email notifications on update where email notifications on issue updates were not triggered when email notification configurations were overriden.
  • MantisTouch was updated with several fixes and improvements.

We would like to take this opportunity to wish all our users a Happy new year.  Best wishes for 2016.

Understanding Email Notifications via EventLog Plugin

Often users are not sure why user X did or didn’t receive an email notification about an action on issue Y.  We have added support for EventLog plugin which when installed helps answering this question by showing the action, its timestamp, who triggered the action, the high level description, and why users were added or removed from the notification list.

To install the plugin, administrators can go to Manage – Manage Plugins and click the install link next to the EventLog plugin.  This will start the process or recording such diagnostic information.  Once done, you can go to the same place and uninstall the plugin.

If the behavior is different than you expect, then it will likely be due to configuration or user preferences.  Feel free to contact support for help.

Here is a screenshot showing some sample output for the EventLog plugin that administrators can access by going to Manage – Event Log.

eventlog_screenshot